Friday, May 27, 2016

Infant/Toddler Swing: Complete!

I can't believe it took over a week for me to finish this swing and get E in it! My pinky took a bit of time to heal, then we got hit with a cold spell and I didn't want to take the little one out in it. Finally, I decided I couldn't wait any longer, so I made E a spring jacket (Using this pattern from Etsy https://www.etsy.com/listing/118350511/hearts-hoodie-baby-girl-boy-jacket?ref=ap_landing) and got out there.

First of all: the full reveal. Isn't it lovely??? I made the leg holes the same size as her high chair legs. I figured if Chicco feels good about that size, so should I. Notice the snapped tabs on each corner. This is something I didn't see on any other tutorial online, and I think it really makes it better. Now I'm not worried about E pulling her legs up and using the corners as another leg hole.


I made the ribbon loops with these toys in mind. They were a gift from my mom (she sent them along with this great tummy time quilt she made). E loves these little letters so much. We have some at each changing station in the house, in the bath, at the table. Pretty much everywhere I may need to distract her so I can get something done.


Now don't call PETA on me. This Peter Rabbit is a toy. I do not recommend hanging actual rabbits by their ears. Disclaimer out of the way. :) I like the clips to hold whatever toys don't have an area to slide through the ribbons. When E chucks it overboard, it only goes this far. Easily within her reach.


I hung the swing so it won't hit the table during play, yet it's close enough that if I pull out the extension, I could use the swing as an outdoor highchair. (Table & chairs from IKEA). And I just have to say it... I love that the swing matches our patio cushions. This was due to the fact I didn't have a plan when I made the cushions and bought too much fabric. At least it's being used!


Now for the gratuitous pictures of a happy baby.


Doesn't she look content? I envision many happy days out here this summer.


Wednesday, May 25, 2016

Stitch Fix Review: May 2016

So, I may have been a little late to the Stitch Fix party, but dang is it fun. Today I'll be bringing you fix #3. Why didn't I bring you #1 & #2? Because #1 was an experiment. And #2 was a complete bust.

In case you haven't heard about it, Stitch Fix is a stylist service in which you fill out a profile, jot down some notes, and link your profile to your Pintrest board of fashion inspiration. From that, a stylist selects 5 items to send you based on your preferences and style. They sometimes give you exactly what you pinned, and sometimes give you something they think you might like based on what you pinned. Sometimes its something you wouldn't have ever tried on, but SURPRISE, you love it. Sometimes they send you something you'd have only tried on in the store as a joke. And you laugh at yourself in the mirror at home.

There's a $20 styling fee that applies towards any of the clothes that you keep. If you keep all 5 items, you get 25% off. If you want to try it out, consider using this link: stitchfix.com/referral/7254645

So now let's get to the fun. Pictures:

First up: Pixley Panorama Henley Blouse; $48. Verdict: KEEP

Very similar to an item I pinned, yet I still didn't think I'd like it all that much. It seemed a little country western to me. Until I put it on. Then I was like "Hmmm. Better than I'd thought." But there were other items in the box I was more excited about so I moved on. Then I took pictures of myself and looked back and that's when I fell in love with this shirt. I didn't expect to. As a matter of fact, I thought this baby was going back, but.. yeah. It's staying.

Style card suggested a long tan cardigan and distressed jeans. This is as close as I had. Granted, I won't wear boots all winger, but I couldn't help pairing it with my favorite brown boots. Super comfy and stylish. Yay!

My style card also recommended a black pencil skirt and grey blazer. Pencil skirts: I have a ton of. Grey blazer, not so much. But still. tucking it into the pencil skirt both felt and looked good. Not sure I'll be wearing my heels anytime soon, but at least they look good!


Next up: Level 99 Cindie Linin Printed Short; $78. Verdict: RETURN

I had told my stylist I was in a summery floral kind of mood, so she sent me these shorts. On the pro side of things, they were crazy soft. Seriously, this material was heaven. And the print wasn't crazy out there. I was tempted. But at $78, I wasn't willing to risk not wearing them. Plus, I had just bought a pair of striped shorts from White House Black Market, and the stripes were enough of an experiment for me this month.

Still, I tried them on with a navy tee shirt. Not terrible. (And can I say how proud I am to have my waistline back 8 months postpartum? This is what walking 8 mi/day during pregnancy and 4-6 after will do)


Also tried out with a basic white tee. Still ok, but I wasn't falling in love with them.


My stylist notes recommended trying it out with this Daniel Rainn top. So I tried. And laughed. Not a great look on me.


But since I had it on...
Daniel Rainn Angelika Crochet Detail Top; $64. Verdict: RETURN

...I tried it with something I would likely pair it with on my own: my Kut from the Kloth bermudas. I thought maybe the tighter shorts would work better with the fuller top.

Nope.


Maybe untucked with white capris? Nope. Figured out that the armholes were what was actually bugging me. Oh, and looking back at this picture made me start singing "They're taking the hobbits to Isengard" --- which is a hysterical youtube you should look up if you haven't seen it yet.


One last wardrobe pairing attempt: I added my trusty blue cardigan. I wear this bad boy too much. Love it. Sure enough, it (along with my Katie & Kelly blue pumps) fixed the outfit.

But I don't wear heels much as a stay at home mom with an infant. And keeping a shirt that I can only wear under something else didn't make the $64 price tag work for me.


Next up: Papermoon Pontiac Crossback Knit Top; $44. Verdict: KEEP

My style card recommended I wear this with a long grey draping cardigan and jeans or a grey jacket and white pants. I had some of those pieces, but not all, so I paired it with what I had: a White House Black Market blazer and white jeans. LOVE it.


Oh, and I even broke out my WHBM nude colored booties. With a nearly 5" heel, they don't make it out of the closet much anymore (I wore them a lot as the youngest and shortest manager in my office) but not much anymore. Looking back at these pictures, that might have to change. What do you think? Could I rock these while pushing a stroller for 4 miles? Think the neighbors might wonder about my sanity? Yeah, me too. But then again... aren't good shoes worth a little crazy?


Since my stylist also recommended this shirt to pair with the floral Level 99 shorts, but i'd already decided on sending those back, I tried out this shirt with my new WHBM striped shorts. Hmmmm. Not sure I love them together. What do you think?


Tried it on with bootcut jeans, Calvin Klein draped cardigan, and my favorite denim flats. Still looking pretty decent.


The reality though, is I am most likely to wear it solo. Without any cardigans. It is summer after all... And it has these great lacy sleeves and cross-back design. I'm seriously in love with this shirt. Oh and it's soft. SO. SOFT. It kinda feels like the best pajamas - that soft.


Last up: Gilli Sebastian Maxi Dress; $78. Verdict: RETURN

I had pinned this exact dress, so props to my stylist for paying close attention. She also took note of my need for breastfeeding friendly clothes. This dress fit that bill perfectly.

Unfortunately, I'm 5'3" (if I'm being generous), and you can see me holding the dress off the floor when wearing flats. Little hint here: with an infant and a high energy dog, you don't have a spare hand to hold your skirt up.


But for giggles, I tried it on with my WHBM 5" booties and Calvin Klein cardigan, and HEY! This is what normal height girls look like! Sadly though, I know I'd want to wear this dress all the time, which meant I'd have to wear heels all the time. And that ain't happening. Yes, I could have hemmed it, but hemming knits is no fun.


So there it is: stitch #3. What do you think of my choices? Anything you would have kept or sent back differently? 

But seriously, if you haven't, go search "They're taking the Hobbits to Isengard" --- it'll get stuck in your head, but it's completely worth it. Assuming you have a bit of the dork blood that I have running through my veins.


Thursday, May 19, 2016

Infant/Toddler Swing Tutorial Part 2 (Woodworking)

I had every intention of having the swing complete today for you, but we had to take a little injury time out. More on that in a few minutes. (Hint: I'm not using all ten fingers to type.)

I will however share the progress made in this morning's nap time, which was short as E decided one hour was enough. :( So today, I bring you the woodworking portion of the swing project!

Supplies Needed:

  • Two 3' lengths of 1" Hardwood Dowels (I used Oak)
  • A drill w/ a larger than 5/16" bit (I went up two sizes and still had to work to get the rope through)
  • Miter Saw or Handsaw
  • Measuring Device
  • Shellac or Finish of your choice (Optional)
SAFETY FIRST: when in the shop, use appropriate protection. Follow all safety guidelines given with your equipment. And remember: there is no more important safety equipment than these (points to eye) safety glasses. (Thank you, Norm Abram & New Yankee Workshop)


Ok, safety check complete? Let's get cracking! Measure 16" lengths on your dowels and cut two at this length. This cut can be done with a miter saw or handsaw. Putting painters tape around the dowel will help prevent splinters if you are using a miter saw.


Measure 15 1/4" on your dowels & cut two. Again, use the painters tape to reduce splinters.


Gather the rest of your supplies. I used a drill and a doweling jig. The jig is handy but not required. You could also use a drill press ...or go to free style with just the drill and a prayer.


Measure 1" from the ends of your dowels. Place a mark.


Using your doweling jig will help you keep the dowel from rolling around. It will also allow you to drill in the center of the dowel which is important for safety reasons. You don't want these holes too close to an edge.


When drilling your holes, use a sacrificial board under your dowels to reduce splinters and protect your (or your husband's in my case) workbench.


Loosen the jig just enough to slide the dowel through until your other end's mark is lined up with your drill hole. Be sure to keep the hole you already drilled upright. You want your holes to be as close to parallel as possible.


Repeat this step with all four of your dowels until they are all lined up like nice soldiers on the bench. Yay!


Now you'll notice the edges are a little harsh. You have options here. If you have an oscillating sander, use it to round over the edges. Be careful of your fingers though. Sanders give particularly nasty manicures. Thus my little injury today. I noticed that my pinky was getting in the habit of sticking out like a Brit enjoying High Tea, and I reminded myself to tuck it in like the Yank that I am. Then I forgot. And the sander reminded me. It's not a serious injury, just a raw finger tip, but it doesn't feel great. I think I'll use it to get out of dish duty for a few days :-p


A better option would have been to use good ole' sandpaper and sweat equity. The edges don't have to be perfectly oval... just rounded over would be fine. I found rolling the end of the dowel into my palm produced the most even round over for me. You can experiment with what works for you.


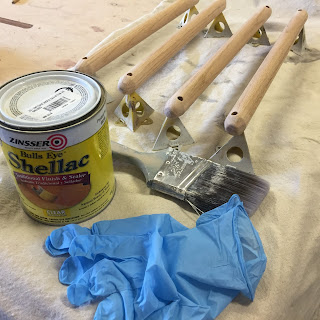
Once you are happy with the ends of your dowels, you can place a finish on if desired. I choose Shellac. Mostly because I had some leftover from previous projects. It is fast drying and once dry it is considered a food safe finish. Given children's need to put anything in their mouth, this was important to me. I didn't use any other stains or dyes on this one, though you could easily use a tea or coffee dye if you wanted to keep it food safe.


Though shellac usually dries in 15 minutes, it takes substantially longer if you dip the ends in the shellac entirely. I got frustrated trying to get the insides of the drilled holes covered in shellac and so... yeah, in the tub they went. I'm at 6 hours and they are just starting to feel dry. I'll let them continue to sit until tomorrow. Hopefully by then my pinky will feel better too. Boo hoo, poor me.


We're getting closer! Soon, I should be able to complete the assembly and get it hung up! Exciting times are in our future! Stay with me!

Wednesday, May 18, 2016

Infant/Toddler Swing Tutorial: Part 1 (Sewing)

Hi, all!

Over the last few months our electric bill has been going up. Technically, ever since E was born. Which is when our laundry needs went through the roof. Cloth diapers are awesome in a lot of ways, but running the dryer that much is pricey! So, I decided that we need a clothes line. And in order to have a chance at hanging laundry, we need a baby swing.

We could buy one. I mean they make swings. Clearly. But this is me that we're talking about. If it's possible to make something, I will. So I did some Pintresting and didn't find any tutorial that fully met what I was wanting. There was one that was close, but all the measurements were metric. Yikes. So here is my version. I hope you enjoy!

Disclaimer: As with anything that supports the weight of your child, please use care with your stitching and supplies that you select. Inspect the swing prior to each use and do not use it if any seams or fabric are fraying. Check your ropes and connections to keep your baby safe. Make modifications to the design as needed to be comfortable with the safety of your child.


Supplies Needed:

Sewing:

  • 1 yard Outdoor Canvas for Outer Fabric
  • 1 yard Outdoor Canvas for Inner Fabric
  • 16 KAM snaps & pliers (or snaps of your choice) 
  • Miscellaneous Ribbons &/or embellishments

Step 1: Cut out your Pieces

For the Seat:
  • 14" x 36" Seat Base/Sides from both Outer & Inner Fabric
  • 11" x 14" Seat Front from both Outer & Inner Fabric
  • 11" x 14" Seat Back from both Outer & Inner Fabric
  • Four 2.5" x 5" Snap Tabs of both Outer & Inner Fabric
  • Three to five 8" Ribbon Pieces (Optional)
  • One to two Plastic Suspender Clasps (Optional)
  • 8 KAM Snaps
For the Pillow:
  • 9" x 17" Outer Fabric
  • 9" x 11" Inner Fabric
  • 9" x 9" Inner Fabric
  • 12" x 18" Outdoor Pillow Form (Or rectangle size of your choice)
  • 3 KAM Snaps
Step 2: Sewing The Seat

Pin tabs fabric right sides together. Sew on three sides, leaving a long side raw. Trim sewn seams with pinking shears to prevent fraying or finish edge with a serger. Turn right side out and press. Top stitch along three sewn sides to finish.


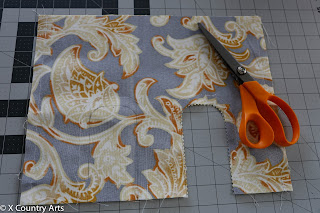
Layout the leg holes on the wrong side of the Outer Fabric front seat piece (as shown below). Find the center of the bottom and mark 1 1/4" from the center in each direction. Mark another 2.5" from each of the first marks. Those are the bottoms of the leg holes. Measure up 4" from each of your marks, then add a 1" Radius semi-circle at the top of each of your 4" lines. Connect the lines to finish the semi-circled leg holes. These lines are your CUT LINES, not your sew lines. You'll sew 1/2" outside the semi-circles.


Pin your marked piece to the corresponding Inner Fabric piece with a Snap Tab 1" from the bottom edge, right sides together.


Be sure to place a pin in each of the leg holes to stabilize those pieces when you stitch. Stitch the short sides as well as the semi-circled leg holes. Leave the top & bottom of the pieces raw.


Cut along your leg hole drawn cut lines with pinking shears to prevent fraying. Also, pink the side Seams.


Clip the inner corners of the leg hole curved areas close to the seam without cutting the seam. This will allow you to turn the pieces right side out without puckers in the material.


Turn right sides out & press seams flat. Press a 1/2" of both the Outer & Inner fabric's top towards each other. Pin any embellishments you selected into the fold created by the pressing. Top stitch around the sides & across the top, still leaving the bottom edge of the piece raw.


Place the Outer & Inner back pieces right sides together. Again, pin your Snap Tab pieces one inch from the bottom on each side right sides together. Stitch on three sides, leaving the bottom side raw. Trim seams with pinking shears.

Locate the mid-point of the 14x36" seat base/side Outer Fabric piece. Place the seat front piece centered on that mid-point, right sides together. Pin.


Repeat this with the seat back piece (find mid point of 14x36" seat base/sides. Pin the back piece in position, right sides together). Lay the Inner Fabric on top, right sides together. Pin.


Sew around perimeter, leaving a 5-6" opening. Trim seams with pinking shears,


Turn right sides out. Press seams flat. Top stitch.


Fold top edges of each piece down 2" toward Outer Fabric. Pin. (If desired, turn your ribbons toward the top. I didn't do this until later, so look ahead at the last picture of this post to see this)


Sew securely. I used parallel seams with a zigzag stitch between them. This creates the pockets for the dowel rods and will take the bulk of the weight. I wanted to be sure to have redundancies in this seam.


Lay out & mark your positions for the KAM snaps. I placed mine 1/2" from the top & bottom edge of the Snap Tabs as shown below.


Notice the side dowel pockets are higher than the front & back. That is intentional as the front & back rods will support the side rods. This will make more sense later, I promise.


Step 3: The Pillow (Optional)

Similar to how you made the plywood pocket, fold the short sides of the Inner Fabric pieces 1/2" down. Press. Fold down another 1/2". Press again. Stitch the pressed sides down to secure those edges. (Step not shown)

Place the two Inner Fabric pieces on the Outer Fabric piece, right sides together, overlapping the inner pieces. This will create a rectangle. Stitch around the perimeter. Turn right sides out.


Mark locations & install 3 KAM snaps. Stuff with pillow insert and snap closed. Note: I used a pillow much larger than the sham I made mostly because that's the pillow form I had. It resulted in a very firm pillow, which I liked.


ADMIRE YOUR WORK! You are done with the sewing part of this project! We'll be getting to the hardware installation & hanging of the swing soon.


I can hardly wait to get E into this swing and clip some of her toys to it so she can play! Even if I don't attach toys to it, I know she'll enjoy the texture of the ribbons. (Note: the picture below shows a plywood base cushion. When I tried out the swing with my little one, I decided the base made her too unstable, and she was more secure using the seat bottom alone as a hammock for her rump.)